Monday 15 May 2017

Component 1 - final piece

Component One - Final piece
For my component one final piece, I decided to look over all of my previous work, to decide what I felt worked the best technique wise. I have always enjoyed creating double exposures, so I felt that this would be a good route to go down in terms of a final piece. 


Final images


Above are the four final images which I will be using for my two final double exposures. Once again I will be incorporating the topic of man and nature by using images from both of the topics. I have also made sure that both images are contrasting in colour (bright and dull).


When I started to create both of my final pieces, I first had to ensure that neither image was a large amount bigger than the other. Luckily this did not pose a problem when it came to my work.
I then brought both images onto to the same document, so they were overlaying. 

The opacity of layer 1 was then changed so that both images could be seen (one more faintly than the other), which created the image shown above.


Then to distort the colour od my photographs to get the purple and yellow tinges, I altered the colour levels withing the photograph layers individually. I felt that this made the piece more abstract, modern and also much more interesting to look at from the viewers eye. Although this was a simple techique to carry out, it took time ensureing the colour levels were correct, and gave the effect that I wanted.


Final results

These are the final results which I achieved with the technique. I do like the initial look of both of the pieces, but at a first glance I wonder if people will be able to see both images clearly straight away. This would be something I would work on if i was to re-try the technique.


Wednesday 8 February 2017

Pinhole Camera

Pinhole Camera Experimentation


I came across an interesting artist when researching my topic who produced some striking landscape images in black and white. Upon further research I realised that these photographs were taken using a pinhole camera and thought that it may be an opportunity to explore this style of photography a little more.  Perhaps the most versatile of all non-camera techniques, pinhole photography has been in existence for the longest time. In fact, it was one of the earliest forms of photography, and modern photography finds its origins from it.
Paul Debois is a multi award-winning photographer. He was a category winner in Kew Gardens’ 2004 Garden Writers annual competition and in 2008 he took two prizes in the International Garden Photographer of the Year for a portfolio of images called Pinhole Impressions. The above image was taken by Debois shows a very distinct style. The image is almost blurred which gives it a dreamy feel. Debois states: "the style did not evolve overnight, several test rolls of film were needed". I thought that perseverance may be necessary with this technique but was willing to give it a try and hopefully my experiments would pay off.


The above image taken by Paul Debois, caught my eye and I liked the very simple composition of the image. The clouds frame the image really well and give the shot a dramatic feel.  They draw the eye to a central focus point and ensure that the tree is the main subject of the photograph.  I liked the soft feel that is provided by the pinhole technique and thought that the effect was very interesting.


The basic concept behind a pinhole camera is to use a light-tight box, within which the picture will be made, even as light passes through a pinhole. It is important that the pinhole on the camera is extremely small and precise in order to get a perfectly sharp image. Failing to do so can result in light leaks or blurred pictures. I think A bit of trial and error will be needed to get perfect exposures, but hopefully using such a tiny aperture will mean that the depth-of-field with the pinhole camera will be interesting and produce some different images.


My Images

Unfortunately my experimentation using pinhole photography was completely unsuccessful.
All the images which I developed were either completely black or with a small circle of light displayed and no detail could be seen on any of the photographs taken of my subjects.
Above is an example of a developed 'black' image which was a complete disappointment.  I think that all my images were dark due to fact that either I had a very large light leak in the camera and I had not ensured all light was blocked from entering or when I initially loaded the film into the camera, light was present so the film was spoiled before I even began. 


The above image is the only photograph which had anything displayed on it at all.  This image could possibly have been either from the very beginning of the film reel or the final image of the spool.  The pinpoint of light is not central to the image which I found perplexing as the shutter and pinhole was created at the very centre of my camera.  Although my images were not successful, I will endeavor to learn from my first delve into the world of pinhole photography and strive to improve both technique and built quality of my equipment to hopefully obtain some more pleasing results next time.


Contact Sheet

Wednesday 18 January 2017

Style - Twilight Saga Opening Titles

Style - The Twilight Saga
Opening Titles

Within this project I will be emulating the style of a movie sequence.  Drawing from my Artist research into Ellie Davies, I have selected the The Twilight Saga as my movie of choice as the opening titles in this film also portray an almost surreal take on landscape photography. I will try to recreate the movies style within my own photographs and also incorporating my theme into my images.


Style Research
 Within the movie's opening sequence the director has selected a clearly edited image as the background for the films title page. I think that the photograph has been enhanced in order to create impact and appeal. The striking blood red sky with the atmospheric moon certainly grabs attention and I love the strong use of colour in this image.  The selection of red fits perfectly with the movies theme of vampires and blood giving the viewer no doubt as to the genre of the film.  The hills are almost silhouettes against this strong sky and I think that this is extremely effective and memorable.  I like the overall composition of the shot and the balance between the hills and the sky with the sweeping horizon placed just off centre draws our attention to the title of the film.  I will experiment with silhouettes and hope to photograph some of my own sunsets in order to explore this visual technique further.


This is the first area of the opening titles which is directed towards both man and nature fitting completely with my theme.  I loved this unusual imagery which at first the viewer believes is blood, however, upon closer inspection is actually images of leaf cells. This particular clip shows the freezing and disappearance of the red areas. The clips try and mainly focus on the difference between living and dead cells.   


The second image from the title sequence shows a more clear demonstration of where the leaf cells and skin cells meet once again.  I loved this visual macro image and found the veins very dramatic. The lines within the skin cells provided great interest within the image and the colour again fitted very well with the theme of the movie.  Using this image as inspiration, I decided to try and take my own Macro images and keeping with the them of blood and cells, decided to look at anatomy to emulate a similar shot.


My Own Photographs

My first image emulates the title page of Breaking Dawn and it's strong use of silhouette and colour.  I enjoyed photographing sunsets and was lucky enough to view several beautiful skies from home during December when the weather turned colder.  I loved this beautiful multi coloured shy which had ribbons of purple, orange and pink running though it.  The dying tree created the perfect centre to my frame and I liked how it was a direct contrast to the living trees adjacent which were still in leaf. I experimented with composition when taking this photo and began with the striking tree to the left of my frame, however, as the shape was so strong, I decided to place this as the focal point of my photograph which I think worked well.


My second photograph taken with inspiration from the opening credits is slightly;y different in style.  This time, as the moon was visible, I decided to try and capture this within the frame and although, it is not as bold as in the Breaking Dawn titles, I still feel it's inclusion in the image gives added interest to the crystal clear blue sky.  Unfortunately, due to a little camera wobble, I was unable to gain a clear crescent, so perhaps in future I could look to using a tripod to enhance my photograph. 


My final image is taken using a macro lens of a dissected chicken heart and was photographed whilst I experimented with photographing anatomy.  I began by looking at the skeletal form as I thought that this would produce good visual shapes, and then took inspiration from a demonstration model of the heart which I photographed, moving on to a real organ. I found the veins and chambers within the chicken heart gave the image interest and keeping the colours rich within the photo allowed the overall final image to be highly dramatic.  I made sure the photo was well lit as this allowed areas of the photograph to be highlighted with little white pools of light which again I found quite pleasing.


Contact Sheets


Tuesday 22 November 2016

Ask An Artist - Cole Roberts

Ask An Artist
- Cole Roberts

For this task I have been researching the work of a Swedish artist named Cole Roberts. Cole is one half of the highly successful photography company Nordica Photography.  He is mainly based within the wedding photography sector, however a vast number of his photographs are based within natural landscapes and try to capture the aspect of isolation, therefore, his images fit my theme perfectly.


Artist's Photographs
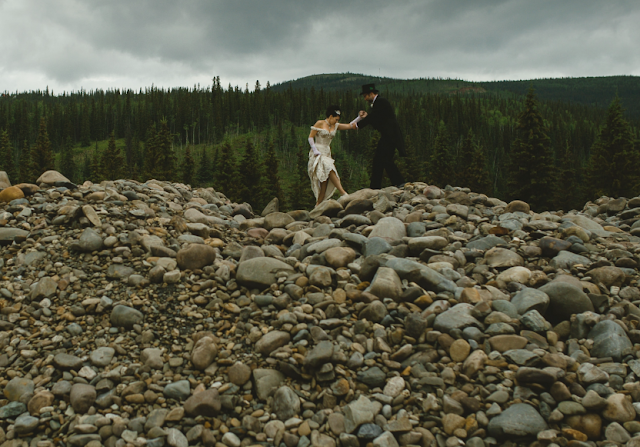
 Due to Cole being an international photographer much of his work is based overseas in varied locations worldwide. The above photograph was taken in Canada, and although the couple are fairly close to the camera, Cole still manages to capture the isolation factor within the landscape by positioning himself lower than eye level.  He keeps the background simple in order that we focus completely on the couple and as the couple are not 'posed' in the frame, we get the opportunity to wonder at their conversation as they clamber over the boulders.  I like the way the horizon in the photograph is lifted giving us a larger view of the stones. This creates great texture to the photograph and gives the impression that walking across this vast beach is quite difficult, especially in a wedding dress. This then validates the man's gestures of help to his wife and provides the viewer with a guessed narrative to accompany the image.


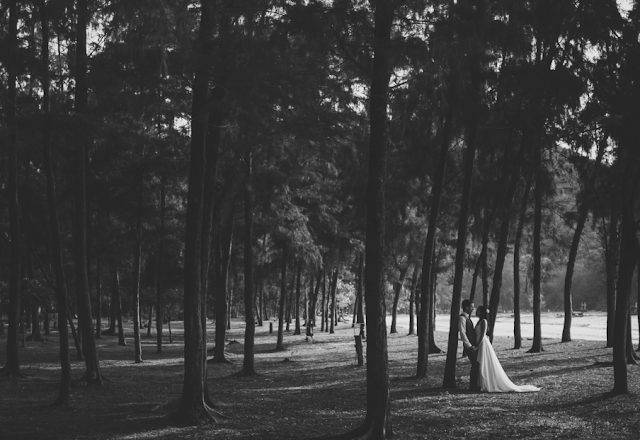
 The second image which I have chosen to represent my theme, taken by Cole Roberts is the above shot. It was captured in Southern Thailand. Although this image does indicate a beach setting to the right of the photograph, it concentrates more on alternative natural beauty by using woodland as a backdrop for the photograph. Cole uses the rule of thirds to compose his shots perfectly, capturing the emptiness of the landscape by positioning the couple to the far right hand side. The trees draw our eyes through the photograph, yet the couple are still prominent and very much the focus of the frame.  I think that shooting this in black and white ensures that the brides dress is highly visible and Cole often uses this technique to ensure our eyes are drawn to to the couple first before then admiring the setting.


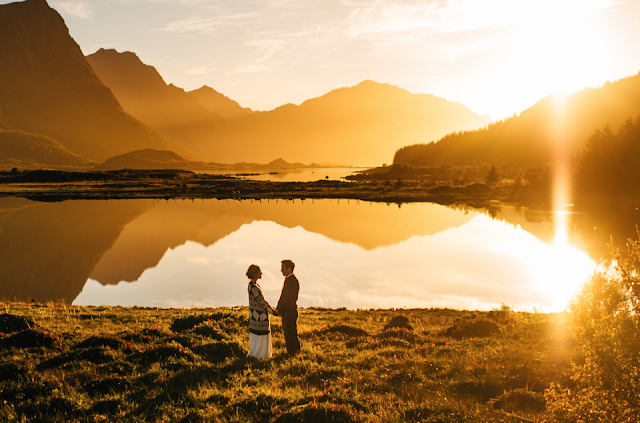
The third artist image chosen is a photograph which mainly focuses on the landscape and surroundings, rather than the people involved. This time, Cole has focused of the surrounding natural light to create a breathtaking backdrop for the couple featured. This photograph was taken in Norway, and shows the photographers professional skill when using light and silhouettes and the reflections of the mountains create drama and give an almost dream like quality to the image. This symmetry of the mountains and their reflection in the water create a perfect composition for the photograph, however, although the setting is so picturesque, the couple are fixed on each other rather than their surroundings.  I was drawn to this image due to the exceptional use of light and I really enjoyed the overall atmosphere this light provides to the photograph.


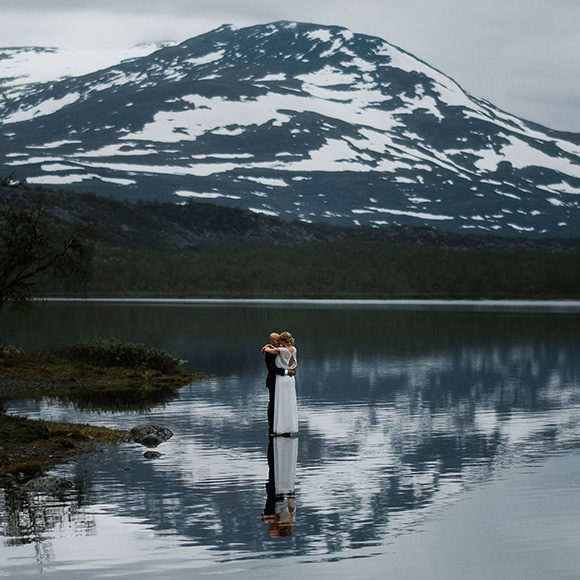
A Further photograph taken with an amazing use of backdrop and reflection is the above image taken by Cole Roberts for a wedding in Norway.  I chose this image as it again shows perfect balance and composition of shot.  The couple are almost floating on the water in this image as the rock they are standing on is completely hidden from view.  The use of reflection is very effective for not only the couple's image is mirrored in the water below but the mountain scenery used as their backdrop is also shown in the lake.  Isolation is very apparent and as the couple do not look at the camera, we feel, as a viewer, that they are completely alone sharing a special moment.


The Questions Asked.

When interviewing Cole, I decided to base all of my questions around the use of isolation as this was a strong recurring theme within his photographs.  I was also keen to explore the types of work the artist was inspired by which could give me further insight into my topic.


  • Q - "Do you purposely try and create isolation within your photography, or is this just a style which you have adopted in your shots based on the surrounding landscape?"
"Well, a wedding is broken into the portraits portion, and “everything else”. The “everything else” is basically interpreting the day as it unfolds and remaining hands off, so it’s tough to say whether that’s purposely isolated or landscape focused. But when it does come time for portraits, it really depends on the wedding, location and time of day for the portraits. The rule of thumb is to go for great light over a great location - even if you’re in Iceland or another dramatic location - so that’s the first thought. Afterwards comes location and generally speaking, stepping back and letting the frame tell the story involves bringing in the natural elements."

  •  Q - "When did you first become a professional photographer and has photography always been a passion?"
"The end of 2009 was when I quit everything and went all-in with photography. My business partner moved over from Europe to Vancouver, and we completely focused on making it work. It was intended to be a one-year project, but grew quite quickly so we went with it.

Photography definitely has not always been a passion for me. My parents started a photo lab in the early 90s, and my mother has been a professional since the 70s. So straightaway I was sort of wrangled into it at a young age, and wasn’t exactly a fan. Growing up, my focus was totally on hockey, so it’s a bit ironic how things unfolded. But around 2008, I got the bug, started photo blogging, and the rest is history."


  • Q - "Has there been a certain artist which you have followed that gives you inspiration or do you just shoot what feels right?"

"I almost never look at other wedding photography, so can’t say I am influenced in any way from people within our genre. The most influential photographer for me definitely is Ragnar Axelsson, and oftentimes when I view his work, there is isolation and a bit of reclusion which I love. Tough to bring that into a wedding day though, so I would say I tend to just photograph whatever is in front of me and not overthink it."

  • Q - "Is Photoshop (or similar programme) a piece of software you use on a regular basis to enhance you photographs, or do some photos just speak for themselves?"

"We use Lightroom to edit everything, but our editing is very light. We feel a timeless image should not be overly edited, and we feel people hire us for our vision and not editing (albeit we realize editing is important so we do not understate quality post-processing)."

  • Q - "Do you ONLY focus on wedding photography or will you tackle any project given?"

"Our brand only speaks to weddings and that’s completely intentional. We would rather be known as masters in one thing as opposed to a jack of all trades. In saying that, you name a genre of photography and we’ve done it, but we simply do not show it anywhere online or elsewhere."


Further Images Taken By Nordica Photography


Landscape Through Man Made Eyes

Landscape Through Manmade Eyes
Stemming on from my time in Iceland, I began to try and experiment with other mixed media techniques as I believed this could provide an interesting angle for my work, so I began to explore the idea of looking at landscapes through man made eyes. 
 Inspired by a memory of viewing the solar eclipse through a welding mask in 2015 in order to view the Phenomenon safely, I have decided to experiment using further man made materials such as clingfilm and bubble wrap to look at natural forms.  Hopefully this technique will still enable the natural object to be viewed however, the nature will be manipulated by a man made object which will fit with my theme of Man & Nature.


Artist's Photographs
The artist whom I have chosen to research and use as my inspiration, is an amateur artist called Alex Kershaw, she used the book "through the looking glass" as inspiration for her photographs.  All the photographs I have featured in this post have been taken through different materials and mediums.
- The first image taken through clingfilm
 - The second image through plastic
- And the third taken through a glass jar

I found that this technique could produce some interesting results and changed the viewers perspective in a creative way. I began to experiment with many different man made objects, hoping to achieve some similar interesting effects.Although many artists don't use mixed media in their landscape photography, I thought it would be interesting to experiment with what kind of effects I could create using man made objects. I will not only use clingfilm, plastic and glass to create my photographs, but also items such as paper with holes cut in, where you will be able to see the landscape behind in a restricted way.The above image, demonstrates what this obliterated view may achieve.
Although the image is taken through another medium, the subject of the photograph is still quite obvious.  In this image the outlines of the trees create interest and the light shining through them creates interest and intrigue within the photograph. The clingfilm itself also creates an interesting linear effect over the whole image and as the plastic catches the sunlight, additional texture and interest is provided.


In this second image taken through plastic, we see different textures emerge.  The plastic used in this image, gives the overall shot a softer feel and the shapes almost blend together. I think that the colour in this photograph is used well and the vivid green leaves in the foreground of the frame contrast well with the blue of the sky.  The almost blurred effect created by the plastic is very appealing and I like the way the plastic alters the shapes and textures of the landscape behind.


The third artist image once again uses manmade objects to enhance the natural scenery within the image. The jam jar is almost used as a magnifying glass, as the bottom of the jar creates the focus point for the image. The blurred edges of the jar also help to emphasise the moss and branches within the centre of the photograph. I think that this technique was highly effective and this almost tunnel effect created by the glass jar, ensures that the viewer does not miss any detail from the subject of the shot.


My Own Photograph's
When deciding exactly how I wanted to replicate the artists images, I debated using many different mediums including sweet wrappers, stained glass and other man made opaque materials.  i also deliberated using different eyewear options such as sunglasses and welding masks. In the end I decided on using motocross/ski goggles as I was able to interchange the different colour lenses, to create different effects. I started out with using a clear lens just to grasp the initial concept behind the technique which produced some interesting results to build upon. My first attempt was quite pleasing and the softened image produced by the goggle lens was appealing.  I liked the way the surrounding goggles remained sharp creating a frame for the photograph.


I then progressed to using a yellow tinted lens to see if i could create a more surreal possibly artistic look to my photographs. I also experimented by using a flash in this particular image to try and create more interest and depth within the photo. I was not overly happy with this effect as it failed to create the striking drama of which I was anticipating.  Instead, the effect obtained was more of a yellow haze within the goggle which I thought drew away from the main subject and the natural features were not prominent enough to be effective.


My third and final image using the goggles was once again more of an experimental shot.  This time, I selected not to use a flash and tried to concentrate on textures of my subject rather than concentrating on light. Once again, unfortunately, I was not entirely happy with the overall effect achieved.  Instead of enhanching the photograph, I found that the goggles did not really add any interest and the textures of the stones were lost through the thick plastic of the goggles.  I thought that by using coloured conifer cuttings within the gravel, these would enhance the shot, however, again this interest seems to blend away and I was left with an uninspiring image.
For my final shot, I will experiment with possibly a thinner material which will hopefully allow the subject to become the focal point rather than being obliterated by the material selected or perhaps by using a more simple subject with a strong silhouette which will not be lost within the photograph.


 As my inspiration came from viewing the eclipse through a welding mask, I decided to return to this concept, however, this time using the moon as my subject.  I tried to ensure that my lens was a close to the viewing window as possible to try and avoid any distortion of image. This final photograph was much more successful and using a more simple subject with a clear outline gave me a most pleasing result.
I particularly liked the way in which the whole colour spectrum is displayed to the left of the image creating an interesting rainbow beaming out from the darkness.  This was completely unintentional, however, gave the shot atmosphere and real appeal.  I was also impressed at the way the shape of the moon was retained and almost enhanced when looking through the welding mask. This was by far my most successful photograph using this technique, however, by learning about subject, light and how this was altered through the man made eyes, I was able to improve my work.


Contact sheets